Influencer Whitelisting: The Marketer's Complete Playbook

Influencer whitelisting is the practice of a creator granting a brand permission to run paid ads directly from the creator’s social handle, while the brand retains full control over targeting, budgets, and creative variations. The ad appears in-feed as though the creator posted it organically, yet the media buy sits entirely within the brand’s ad account. According to Aspire, this structure turns creator posts into paid placements that carry the creator’s name, avatar, and trust signals while the brand manages spend and audience selection. The result is a layered performance dynamic: the authenticity of creator attribution combined with the precision of paid targeting, which typically lifts click-through rates and return on ad spend beyond what either channel achieves alone. Use whitelisting when you run paid social at scale, have repeatable creator content, or maintain a long-term partnership where the creator’s voice has already earned audience trust.
- The brand controls targeting, creative testing, and spend; the creator retains account ownership.
- Ads appear from the creator’s handle, not the brand’s page, preserving organic trust signals.
- Launchpoint notes that this model combines creator credibility with the full suite of paid media controls, including custom audiences, lookalikes, and A/B creative testing.
- Whitelisting is most effective when paired with a long-term creator relationship and a content cadence that supports ongoing ad iteration.
Key Takeaways
Influencer whitelisting delivers its strongest results when the brand treats the creator’s handle as a paid media asset to be tested and iterated, not simply amplified.
| Point | Details |
|---|---|
| When to use whitelisting | Use it when running paid social at scale with repeatable creator content or a long-term partnership. |
| Meta prerequisites | Creator needs a Professional Instagram account linked to a Facebook Page; brand needs Meta Business Manager in good standing. |
| Pricing benchmarks | Micro-influencers typically charge $150–$500/month; mid-tier creators charge $500–$2,000/month for whitelisting access. |
| Contract essentials | Always list whitelisting as a separate line item with defined duration, platform scope, spend cap, and revocation terms. |
| ANT Management | ANT Management offers managed whitelisting coordination, from talent curation and contracting to permission setup and campaign reporting. |
Table of Contents
- What is influencer whitelisting and how does it differ from brand-owned ads?
- How influencer whitelisting works: three common models
- How to whitelist influencers on Meta (Facebook & Instagram)
- What whitelisting looks like on TikTok, YouTube, and Snapchat
- Which creators and content should you whitelist?
- Pricing and negotiation: how influencers charge for whitelisting
- Legal, permissions, and FTC disclosure: what every contract needs
- Measuring and optimizing whitelisted ad campaigns
- Your 10-step checklist to launch a whitelisted campaign
- How ANT Management handles influencer whitelisting for brands
- The real friction in whitelisted campaigns
- ANT Management’s managed whitelisting service
- Sources
What is influencer whitelisting and how does it differ from brand-owned ads?
Whitelisting, also called allowlisting or partnership advertising, is a formal permission model in which a creator grants a brand advertiser-level access to their social account for the purpose of running paid media. The industry also uses the term “Spark Ads” on TikTok to describe the platform’s native version of this workflow. What separates whitelisting from a standard brand-owned ad is attribution: the ad unit displays the creator’s handle, profile image, and name rather than the brand’s page, so the audience reads it as creator content even when the brand is funding and directing the placement.
A brand-owned ad, by contrast, runs from the brand’s own page or ad account identity. The audience sees the brand name in the “Sponsored” label, which carries different trust dynamics. Boosting, another common alternative, amplifies an existing organic post from the creator’s feed but gives the brand limited targeting control and no ability to run dark posts (paid-only placements that never appear on the creator’s public profile). Whitelisting resolves both constraints.
Whitelisting gives brands the ability to run dark posts from a creator’s handle, meaning the ad reaches paid audiences without ever appearing on the creator’s organic feed. This separation of paid and organic footprints is one of the most underused advantages of the model, and it should be documented as a distinct line item in every whitelisting contract.
Practical differences worth mapping before any campaign build:
- Targeting control: Whitelisting gives the brand full access to custom audiences, lookalikes, interest layers, and exclusion lists. Boosting restricts targeting to a simplified set of options.
- Creative variations: Brands can create multiple ad variants from a single whitelisted post, testing different headlines, CTAs, and copy without the creator needing to post each version organically.
- Reporting: Whitelisted campaigns report into the brand’s ad account, giving media buyers unified attribution data alongside other paid channels.
- Dark posting: Only whitelisting (not boosting) supports dark posts, which are essential for audience segmentation and creative testing at scale.
- Organic footprint: Boosted posts appear on the creator’s profile. Whitelisted dark posts do not, preserving the creator’s feed aesthetic and editorial voice.
How influencer whitelisting works: three common models
Not every whitelisting arrangement looks the same. Three distinct permission models appear regularly in US market practice, each with different levels of brand control, creator exposure, and contract complexity.
Model 1: Ad-account access (Meta Partnership Ads)
The brand is added as a partner advertiser within the creator’s Meta Business Suite. Once the creator accepts the partnership request, the brand can build ads using the creator’s account as the ad identity directly inside Meta Ads Manager. This is the most comprehensive model: the brand controls all targeting, creative variations, placements, and spend without needing the creator to take any action post-authorization. Launchpoint identifies this as the standard Meta whitelisting workflow and the one that gives brands the deepest performance controls.
- Pros: Full targeting access, dark posting, creative testing, unified reporting, no per-post friction.
- Cons: Requires the creator to have a Professional Instagram account linked to a Facebook Page; setup friction is higher upfront; creator must trust the brand with account-level access.
Model 2: Post-level authorization (TikTok Spark Ads)
TikTok’s version of whitelisting operates post by post. The creator generates an authorization code for a specific video inside TikTok’s creator tools, and the brand enters that code in TikTok Ads Manager to run the post as a Spark Ad. Influee notes that each code applies to one video only, so a campaign using five creator videos requires five separate codes. This model is more granular and limits brand exposure to specific approved content.
- Pros: Creator retains tighter control over which content is amplified; lower account-level risk; well-suited to TikTok’s performance environment.
- Cons: Per-post workflow creates operational overhead at scale; codes expire; no account-level creative testing across the full creator library.
Model 3: Content licensing (brand-run ads using creator assets)
This model is technically not whitelisting. The brand licenses the creator’s video or image assets and runs them as ads from the brand’s own handle. The ad appears as brand-sponsored content, not creator content. ChannelCore draws a clear distinction here: content licensing preserves brand control but sacrifices the creator attribution signal that makes whitelisting perform differently from standard paid social. It is useful when a creator is unwilling to grant account access but has produced content the brand wants to amplify.
- Pros: No account-level permissions required; brand retains full creative control; simpler from a platform-access standpoint.
- Cons: Loses creator trust signal; ad appears as brand content; typically lower engagement rates than true whitelisted creator-handle ads.
The standard campaign flow across all three models: negotiate terms and define scope → creator grants permission (account-level or post-level) → brand builds ad creative in the relevant ads manager → campaign launches with brand-controlled targeting → reporting flows into brand’s ad account → performance review and iteration.
How to whitelist influencers on Meta (Facebook & Instagram)
Meta’s Partnership Ads workflow is the most widely used whitelisting path for US marketers, and the setup sequence matters. Missing one prerequisite can block the entire campaign build.
Prerequisites
Before sending a partnership request, confirm:
- The creator has an Instagram Professional account (Creator or Business type), not a personal account.
- The creator’s Instagram is linked to a Facebook Page they administer.
- The brand has a Meta Business Manager account in good standing with no policy violations.
- The brand’s ad account is active and has a verified payment method.
Adweek has documented Meta’s ongoing changes to branded content tagging and partnership flows, so verifying the current setup steps in Meta’s own Business Help Center before onboarding any creator is worth the extra ten minutes.
Step-by-step setup
- Send a partnership request. In Meta Business Suite, navigate to the “Partnership Ads” section and enter the creator’s Instagram handle to send an access request.
- Creator accepts the request. The creator receives a notification in their Instagram Professional Dashboard and approves the brand as a partner advertiser.
- Confirm permissions level. Verify the brand has been granted “Advertiser” permissions, not just “Analyst” access. Analyst access allows reporting only; Advertiser access enables ad creation.
- Open Meta Ads Manager. Create a new campaign or ad set. At the ad level, select “Use a partner’s account” and choose the creator’s account as the ad identity.
- Choose dark post or existing post. Select whether to run a dark post (a new paid-only placement that won’t appear on the creator’s feed) or to amplify an existing organic post from the creator’s profile.
- Set duration controls. Define the campaign flight dates within Ads Manager and confirm they align with the permission window agreed in the contract.
- Apply tracking. Add UTM parameters to all destination URLs and confirm the Meta Pixel or Conversions API is firing correctly on the landing page.
- QA the ad identity. Preview the ad to confirm the creator’s handle, avatar, and name appear correctly in the “Sponsored” label position.
Common errors to resolve before launch
- Creator’s Instagram is not linked to a Facebook Page: the partnership request will fail.
- Creator account is set to Personal rather than Professional: account-level access is unavailable.
- Brand has Analyst rather than Advertiser permissions: ad creation is blocked.
- Partner access has expired mid-flight: the ad will stop serving; set calendar reminders before expiry.
Adweek’s reporting on Meta video creator updates also flags that video permission flows and metadata handling can shift with platform updates, so treat video asset authorization as a standing item on every campaign checklist.
Technical checklist before launch:
- Ad account ID confirmed and shared with the creator for reference.
- Pixel or Conversions API verified on the destination URL.
- UTM parameters applied to all links.
- Spend caps set at the ad set level.
- Reporting access granted to relevant team members.
- Partnership permission expiry date logged in the project tracker.
Pro Tip: Pre-negotiate duration and spend caps in the contract before granting platform-level permissions. This prevents awkward mid-flight conversations about extending access or adjusting budgets, and it gives both parties a clear off-ramp if the campaign underperforms.
What whitelisting looks like on TikTok, YouTube, and Snapchat
Meta offers the most mature account-level whitelisting infrastructure, but other platforms have their own authorization models, each with meaningful differences in friction and capability.
| Platform | Access level | Typical friction | Best use case |
|---|---|---|---|
| Meta (Facebook & Instagram) | Account-level | Medium (one-time setup) | Full creative testing, dark posts, retargeting |
| TikTok (Spark Ads) | Post-level | High (one code per video) | Short-form video performance, TikTok-native audiences |
| YouTube | Content licensing / BrandConnect | Medium to high | Long-form endorsement, pre-roll adjacency |
| Snapchat | Post-level or licensing | High (varies by account type) | Younger demographic, story-format placements |
TikTok Spark Ads are the platform’s closest equivalent to whitelisting. The creator generates an authorization code inside TikTok Studio for each specific video, and the brand enters that code in TikTok Ads Manager to run the post as a paid placement. Influee notes that codes are video-specific and expire, which means operational overhead scales with the number of creator videos in the campaign. The performance upside is real: Spark Ads carry the creator’s organic engagement data (likes, comments, shares) into the paid placement, which can improve social proof signals.
YouTube does not offer native account-level whitelisting in the same way Meta does. Most YouTube creator partnerships route through Google’s BrandConnect platform or rely on content licensing agreements where the brand runs creator-produced assets as standard video ads from the brand’s channel. The creator’s handle does not appear as the ad identity in most YouTube placements.
Snapchat’s authorization flows vary by account type and campaign objective. Full account-level access is not consistently available, so most Snapchat creator partnerships default to content licensing or per-post authorization workarounds. For US marketers prioritizing scale and measurement precision, Meta remains the primary whitelisting platform, with TikTok Spark Ads as a strong complement for short-form video campaigns.
Which creators and content should you whitelist?
Selection is where most whitelisting campaigns succeed or fail before a single dollar is spent. The permission model amplifies whatever the creator brings to the table, so a misaligned creator or weak content format will simply reach more of the wrong people more efficiently.
Creator selection checklist
- Audience alignment: The creator’s follower demographics (age, location, interest category) must overlap meaningfully with the brand’s target customer profile.
- Engagement quality: Look beyond follower count. Examine comment sentiment, reply depth, and save rates. High follower counts with generic comments (“great post!”) signal low-quality engagement.
- Creative format fit: Vertical video UGC, short testimonial clips, and product demos tend to scale best in whitelisted placements. Static image posts can work but typically underperform video in paid social environments.
- Conversion history: If the creator has run affiliate links or promo codes, request performance data. Past conversion behavior is the strongest predictor of whitelisted ad performance.
- Real follower verification: Use a third-party audit tool (HypeAuditor or similar) to check for follower authenticity before contracting.
- Account type compliance: For Meta, confirm the creator has a Professional account linked to a Facebook Page before any negotiation begins.
Red flags to avoid
- Follower-to-engagement ratios that fall well below category benchmarks.
- Content style that conflicts with the brand’s visual or tonal identity.
- No linked Facebook Page (a hard blocker for Meta whitelisting).
- Unwillingness to share analytics or past campaign performance data.
- A history of posting competitor brand content without disclosure.
Flinque notes that whitelisting outperforms simple boosting precisely because brands gain full targeting and creative testing control while retaining the creator’s trust signals. That advantage disappears when the creator’s audience is misaligned or the content format doesn’t translate to paid placements.
Content formats that scale
- Vertical video UGC (15–30 seconds) with a clear product moment in the first three seconds.
- Short testimonial clips where the creator speaks directly to camera about a specific benefit.
- Product demos with a visible transformation or before/after structure.
- Clean raw footage without heavy text overlays, which gives the brand room to add its own copy variations.
Pricing and negotiation: how influencers charge for whitelisting
Whitelisting rights are a distinct commercial asset, separate from the content creation fee. Yotpo observes that creators frequently undercharge for whitelisting access because they conflate it with the base content fee, and practitioners consistently advise listing whitelisting as a discrete line item in every contract.
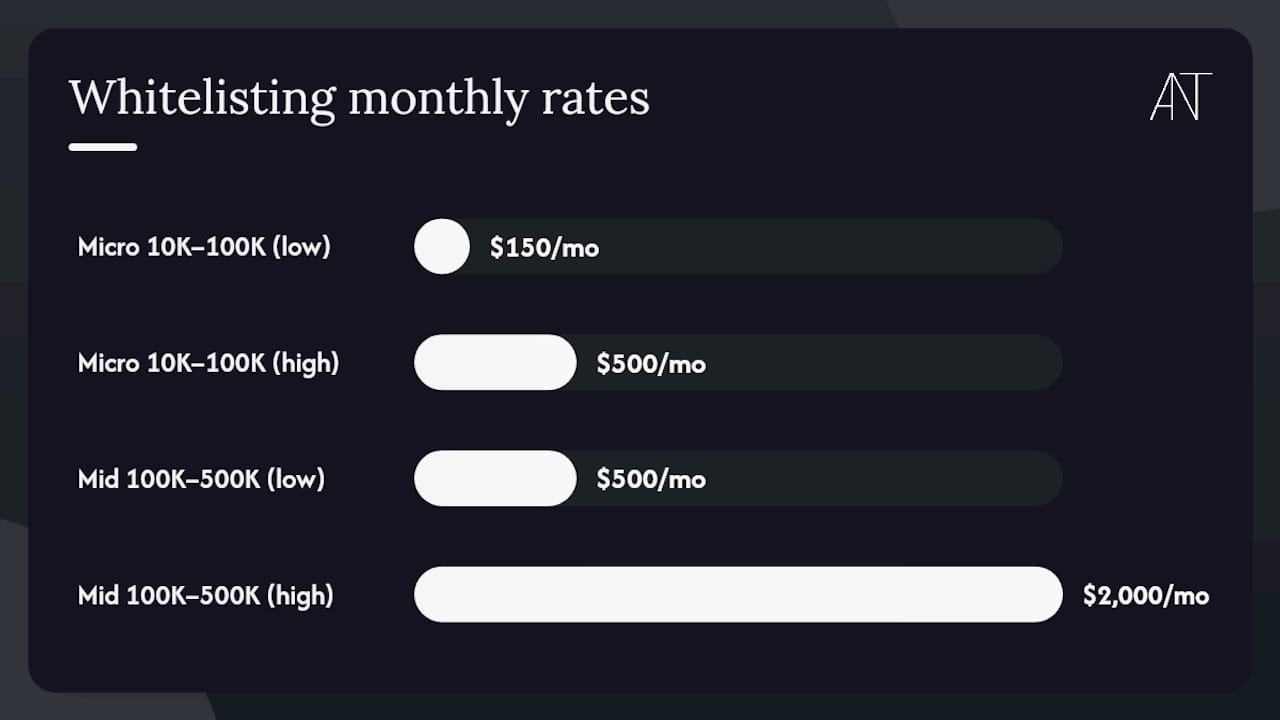
Common pricing models include a flat monthly or periodic fee, a percentage premium added to the content fee, a revenue share tied to attributed sales, or a minimum guarantee plus a performance bonus. Influee provides the most cited benchmark ranges in current US market practice: micro-influencers (10K–100K followers) typically charge $150–$500 per month for whitelisting access, while mid-tier creators (100K–500K followers) command $500–$2,000 per month.
Treat whitelisting fees the way a licensing attorney treats image rights: duration, platform scope, exclusivity, and geographic reach each have independent commercial value. A creator who charges a flat fee for “unlimited use” is leaving money on the table, and a brand that accepts that framing is acquiring rights it may not need while creating ambiguity that complicates future negotiations.
Negotiation clauses to include in every whitelisting agreement:
- Duration: Define the exact start and end date of the whitelisting window. Avoid open-ended language like “until further notice.”
- Geographic scope: Specify whether the brand can target US-only audiences or global placements.
- Platform list: Name each platform explicitly (Instagram, Facebook, TikTok). Do not use catch-all language.
- Exclusivity terms: State whether the creator is restricted from posting competitor content during the whitelisting window.
- Spend caps: Set a maximum monthly ad spend the brand may deploy from the creator’s account.
- Reporting cadence: Agree on how often the brand will share performance data with the creator.
- Termination and revocation: Define the notice period required for either party to end the arrangement and the process for revoking platform permissions.
Present whitelisting as a separate line item on the proposal, labeled clearly as “Whitelisting / Partnership Ad Access Fee,” with duration and platform scope noted alongside the dollar amount. This framing protects both parties and makes renewal negotiations cleaner.
Legal, permissions, and FTC disclosure: what every contract needs
A whitelisting agreement without clear legal scaffolding creates exposure for both the brand and the creator. The contract must address not just the commercial terms but the compliance obligations that govern paid influencer placements in the US.
Contract checklist
- Explicit whitelisting grant: A clause stating the creator grants the brand permission to run paid advertisements from the creator’s account on named platforms for a defined period.
- Scope definition: Platforms, post types (dark posts vs. existing posts), geographic targeting, and any creative modification rights.
- Payment terms: Fee structure, payment schedule, and conditions for withholding payment if the creator revokes access early.
- Reporting rights: The brand’s right to access campaign-level performance data and share it with the creator on an agreed cadence.
- Revocation procedure: A defined process and notice period (typically 14–30 days) for the creator to revoke platform access, with consequences for early revocation.
- Data and PII handling: Language governing how pixel data, retargeting audiences, and any consumer data collected through whitelisted placements are stored and used.
FTC disclosure requirements
The FTC’s endorsement guidelines apply to whitelisted ads. When a paid placement runs from a creator’s handle, the “Sponsored” or “Paid partnership” label that Meta and TikTok apply to paid placements typically satisfies the platform-level disclosure requirement. However, the brand and creator share responsibility for confirming that disclosure is clear and conspicuous. Creators should not caption dark posts in ways that obscure the commercial relationship, and brands should not suppress disclosure labels through ad settings.
- The brand bears primary responsibility for ensuring the ad unit carries the correct paid placement label.
- The creator bears responsibility for any organic captions or stories that reference the brand during the whitelisting window.
- Both parties should retain records of the disclosure language used for a minimum of three years.
Privacy and tracking
Pixel access through a whitelisted account means consumer data flows into the brand’s ad account. The contract should specify that the brand will not use retargeting audiences built from whitelisted campaign data for purposes outside the defined campaign scope. Where the brand operates under CCPA or other state-level privacy frameworks, include consent language that covers retargeting use cases.
Measuring and optimizing whitelisted ad campaigns
Whitelisted campaigns report into the brand’s ad account like any other paid placement, but the performance benchmarks shift. Creator-handle ads typically carry different engagement dynamics than brand-page ads, and reading those signals correctly is what separates iterative optimization from reactive budget cuts.
KPIs to track
| KPI | What to watch for in whitelisted campaigns |
|---|---|
| CTR (click-through rate) | Creator-handle ads often outperform brand-page ads; a drop signals creative fatigue |
| CPC (cost per click) | Should decrease as the algorithm optimizes toward engaged audiences |
| Conversion rate | Benchmark against brand-owned ads on the same landing page to isolate the creator effect |
| ROAS (return on ad spend) | Track at the ad set level to compare creator performance across the roster |
| CAC (customer acquisition cost) | Compare whitelisted vs. brand-owned campaigns to quantify the creator trust premium |
| View-through rate | Particularly relevant for video; high VTR with low CTR may indicate strong awareness but weak CTA |
Optimization checklist
- Rotate creative variants every 10–14 days to manage frequency fatigue.
- Test at least two audience segments per creator (lookalike vs. interest-based) before drawing conclusions.
- Set frequency caps at 3–4 impressions per user per week for awareness objectives; tighten to 2 for conversion campaigns.
- Match creative format to placement: vertical video for Stories and Reels, square or landscape for Feed.
- Schedule ads around the creator’s organic posting cadence to amplify the halo effect of organic reach.
Testing framework
- A/B test creative hooks: the first three seconds of video determine whether a viewer continues watching.
- Rotate CTAs across ad variants (“Shop now” vs. “Learn more” vs. “Get yours”) to identify which drives the highest conversion intent for this creator’s audience.
- Test dark posts against visible posts to measure whether organic feed presence amplifies paid performance or creates frequency overlap.
- Scale winning variants gradually, increasing budget by no more than 20% every 48–72 hours to avoid disrupting the algorithm’s learning phase.
Flinque emphasizes that the performance advantage of whitelisting over boosting comes precisely from this creative testing capability. Brands that treat whitelisted placements as static amplification rather than iterative creative labs leave most of the model’s value unrealized.
Your 10-step checklist to launch a whitelisted campaign
A clean launch sequence prevents the most common delays: expired permissions, missing pixels, and misaligned creative specs.
- Define campaign goals. Set specific KPI targets (ROAS, CAC, CTR) before selecting creators. Goals determine which creator profile and content format to prioritize. (Owner: brand / media buyer)
- Select and vet creators. Apply the selection checklist from the creator section above. Confirm account type and platform prerequisites before any outreach. (Owner: brand / talent partner)
- Negotiate and execute the contract. Include all whitelisting-specific clauses: duration, platforms, spend cap, reporting cadence, revocation terms, and FTC disclosure responsibilities. (Owner: brand legal / creator)
- Grant and confirm platform permissions. Creator sends the partnership request acceptance (Meta) or authorization codes (TikTok). Brand confirms correct permissions level before proceeding. (Owner: creator + brand media buyer)
- Set up pixel and tracking. Verify the Meta Pixel or Conversions API is firing on all destination URLs. Apply UTM parameters to every link. (Owner: brand media buyer / analytics)
- Build the campaign in Ads Manager. Select the creator account as the ad identity, configure targeting, set spend caps, and upload creative variants. (Owner: brand media buyer)
- QA the ad unit. Preview the ad to confirm creator handle, avatar, disclosure label, destination URL, and UTM parameters are all correct. (Owner: brand media buyer)
- Launch and monitor the first 48 hours. Watch for delivery issues, policy flags, and early CTR signals. Do not make budget changes in the first 24 hours while the algorithm is in the learning phase. (Owner: brand media buyer)
- Iterate on creative and targeting. After the first 7–10 days, apply the optimization checklist: rotate variants, test audiences, adjust frequency caps. (Owner: brand media buyer)
- Scale winners and document learnings. Increase budget on top-performing ad sets by 20% increments. Document which creator, format, and audience combination drove the best results for future campaign planning. (Owner: brand / media buyer)
Starter asset list for launch:
- Minimum two creative variants per creator (different hooks or CTAs).
- Creator-approved caption copy for each ad variant.
- Tracking UTMs for every destination URL.
- Backup static image assets in case video delivery underperforms.
- Shared reporting dashboard access for the creator and internal stakeholders.
How ANT Management handles influencer whitelisting for brands
Running whitelisted campaigns at scale requires coordination across talent identification, legal contracting, platform permissions, and media buying, and each handoff between those functions is a point of friction. ANT Management’s managed workflow addresses that friction by consolidating the process under one coordinated structure.
The managed workflow covers:
- Talent identification: ANT Management’s curated roster of influencers and content creators is selected through a rigorous curation process, with creators whose content formats and audience profiles are validated for paid social performance.
- Contracting: The agency handles whitelisting-specific contract language, including duration, platform scope, spend caps, and revocation terms, so brands don’t negotiate blind.
- Permission handling: ANT Management coordinates the platform-level permission grants between creator and brand, reducing the back-and-forth that typically delays campaign launches.
- Ad build coordination: The agency aligns creative assets, tracking setup, and campaign configuration so the media buyer receives a ready-to-launch package.
- Reporting handoff: Unified performance reporting is delivered to the brand, covering KPIs across the creator roster rather than requiring the brand to aggregate data from multiple ad accounts.
The most common delay in whitelisted campaigns is not the media buy — it is the permission handoff. A creator who doesn’t understand what they’re granting, or a brand that sends the wrong permissions request, can add two weeks to a campaign timeline. A managed partner who has run this process dozens of times compresses that window to days.
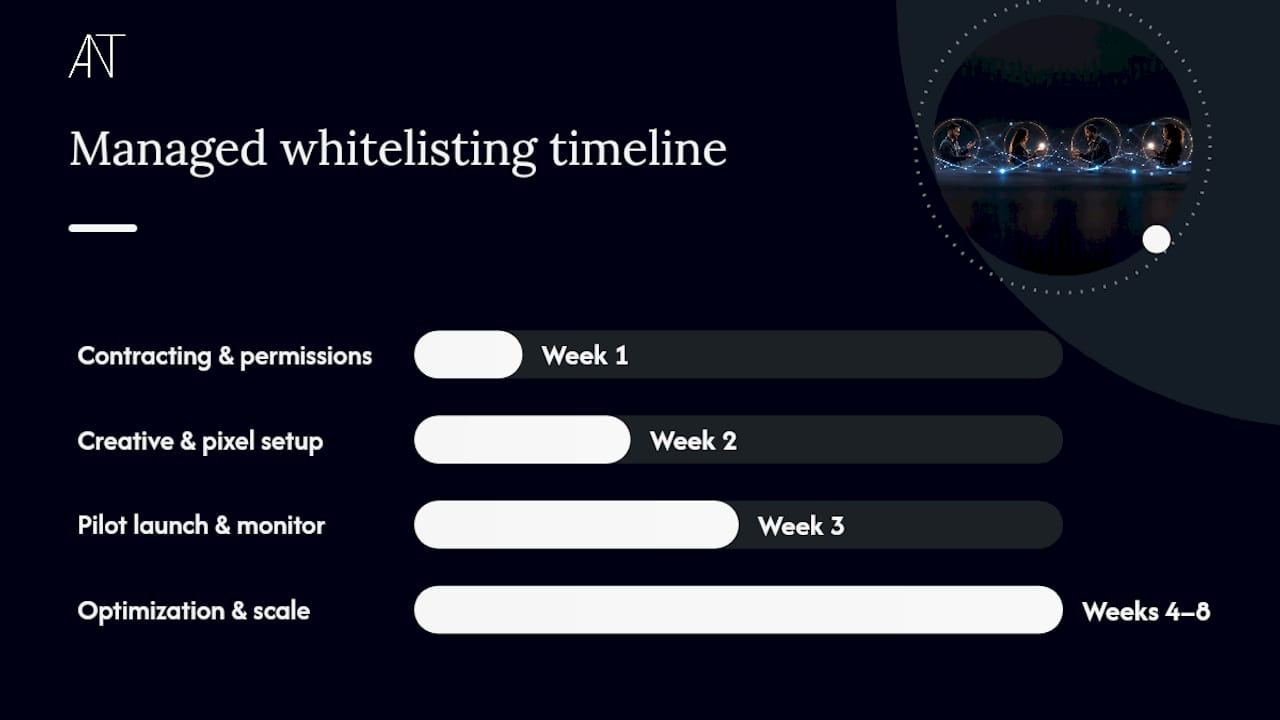
A typical managed timeline from contracting to scale:
- Week 1: Contract execution and platform permission setup.
- Week 2: Creative asset delivery, pixel verification, and campaign build.
- Week 3: Pilot campaign launch and first-week monitoring.
- Weeks 4–8: Iterative optimization and gradual scale of winning ad sets.
ANT Management’s training programs, including ANT Camp, also mean that creators in the roster understand the commercial and technical expectations of whitelisting partnerships before they enter a brand agreement, which reduces creator-side friction at every stage.
The real friction in whitelisted campaigns
The mechanics of whitelisting are well-documented. The friction is not. What actually slows campaigns down is the gap between what a brand expects from a creator and what a creator understands they’re agreeing to.
Most creators who accept a whitelisting request have never read a Meta Business Suite permissions screen carefully. They approve the request because the brand asked, then panic two weeks later when they see an ad running from their handle that they don’t recognize. That moment of confusion, if not pre-empted by a clear briefing and a well-drafted contract, can result in a permission revocation mid-flight and a campaign that goes dark with no warning.
The other friction point is creative iteration. Brands often treat the first whitelisted ad as the final version. The model’s real value comes from treating the creator’s handle as a testing environment: rotating hooks, swapping CTAs, and reading the signal differences between dark posts and visible posts.
Creator selection matters more than most brands admit. A creator with 80,000 highly engaged followers in the exact demographic the brand targets will consistently outperform a creator with 500,000 followers whose audience engagement is shallow. The permission model amplifies the creator’s existing relationship with their audience. If that relationship is thin, the amplification makes it thinner faster.
ANT Management’s managed whitelisting service
For brands that want the performance advantages of whitelisted influencer ads without the operational complexity of managing permissions, contracts, and creative coordination in-house, ANT Management offers a managed approach that covers the full workflow from talent selection to campaign reporting.
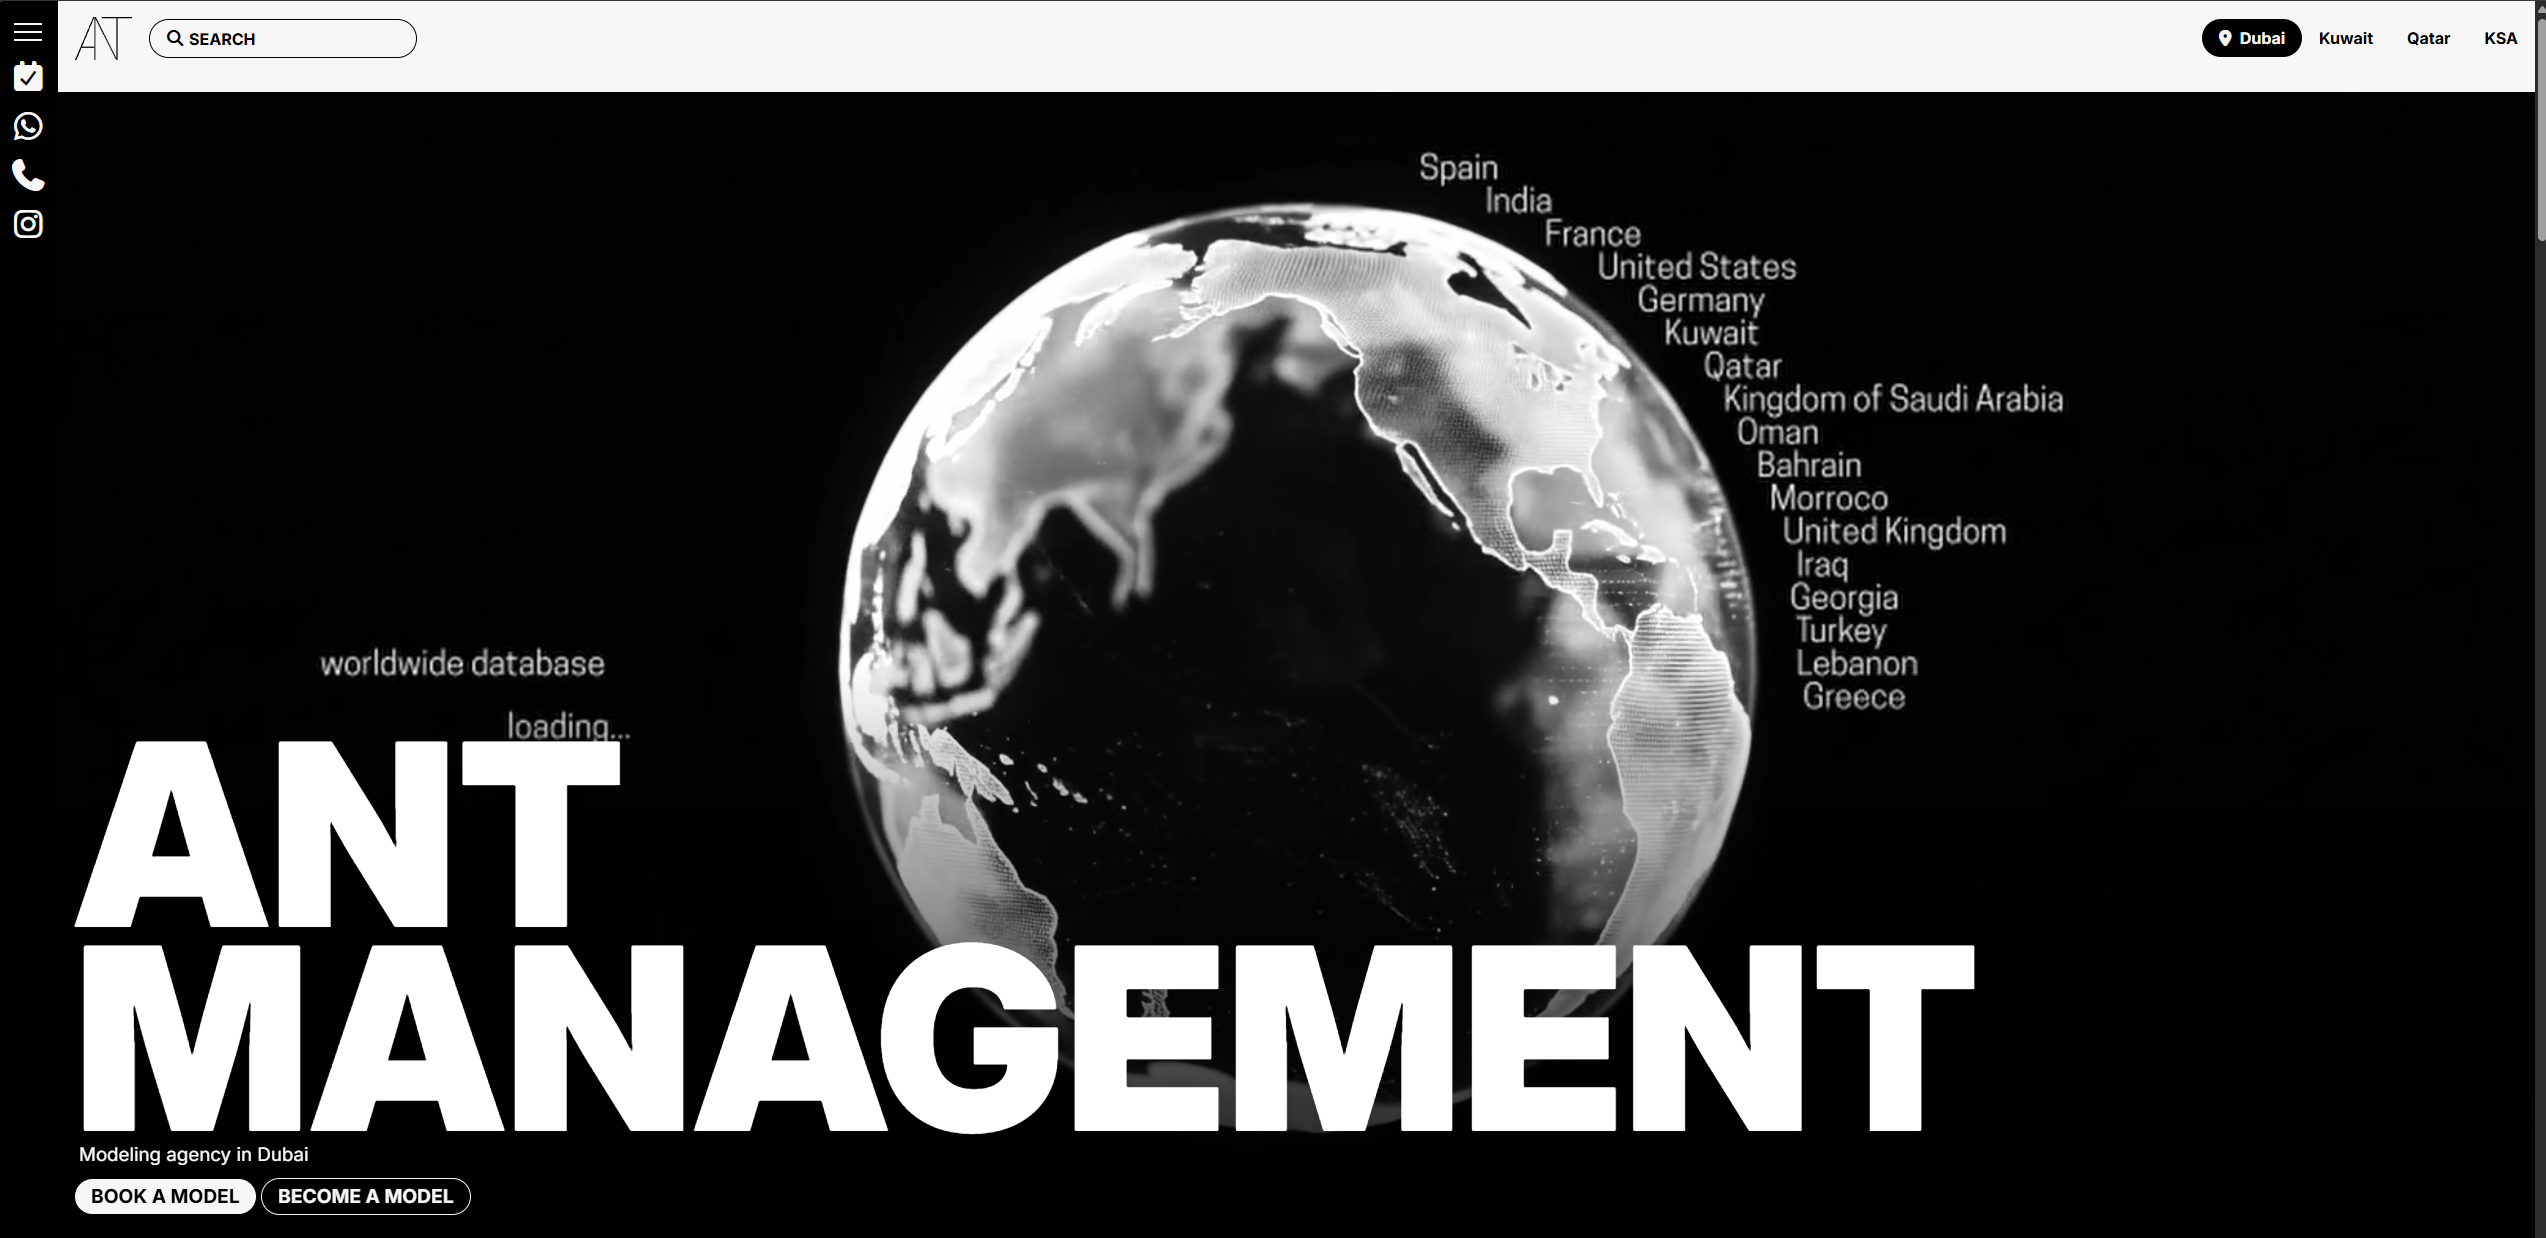
ANT Management’s global talent network spans influencers and content creators across fashion, beauty, lifestyle, and commercial categories, each curated for both creative quality and paid social performance. The agency handles whitelisting-specific contracting, platform permission coordination, and reporting consolidation, so your media team receives a campaign-ready package rather than a permissions puzzle. Creators in the ANT Management roster, many of whom have trained through ANT Camp, arrive to brand partnerships with a clear understanding of what whitelisting entails, which compresses the typical onboarding timeline significantly.
To explore managed whitelisting partnerships and review available talent for your next campaign, visit ANT Management and connect with the team directly.
Sources
- What Is Influencer Whitelisting? How It Works for Brands in June 2026 | Launchpoint
- Influencer Whitelisting: Meaning, Setup & ROI
- Influencer Whitelisting Guide: How It Works | Flinque
- What Is Influencer Whitelisting? | Yotpo
- Facebook is making some changes to its branded content tag | Adweek
- Master Influencer Whitelisting: Key Insights for Marketers